Showing posts with label Ms word. Show all posts

Tuesday, August 31, 2010

convert/Translate text document in other language using MS Word 2007

Sometimes we need to translate documents from english to some other language or viceversa. If u need to do this and you don't know that language, then now you can do this simply by using MS Word 2007, no need of translator.

you can insert phrases from languages you do not know into your documents, duplicate documents in multiple languages without retyping and transform documents you have received in foreign languages so you can read them.


Just follow these steps to translate document into other language:

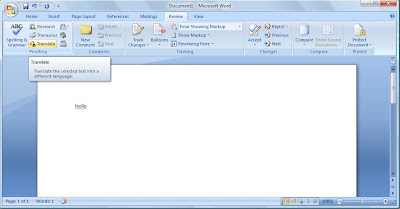
1). Open document and select text which you want to translate.
2). Click on Review button on toolbar then on translate.


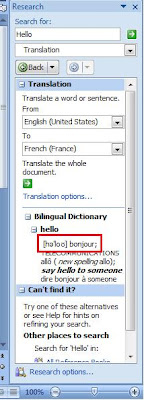
3). A window will open on right hand side, here select language in which you want to convert document and also existing language.


4). Click on Go.
5). The selected or highlighted text will be translated in the lower part of the task pane shown in figure.


If you need to translate the selected text into a language that is not included in the given list, click on Translation options and select the particular language you want.

Sunday, August 8, 2010

Disable the Blinking Cursor in Computer Applications

If you are using any computer application, for example MS Word or MS FrontPage and you did not like blinking of cursor. Now you can stop the cursor from blinking in these applications, for this you have to edit your computer registry keys, but be careful to work with computer registry. Its very simple just follow the given steps to stop cursor from blinking:


1). Click on Start button then type Regedit in Run option.

2). Here browse the location to:

HKEY_CURRENT_USER>Control Panel>Desktop.


3). Now here add the string value.

4). Enter its name CursorBlink and value -1.

5). Reboot your computer.

Its done.

Tuesday, August 3, 2010

Simple tips to select Text quickly in MS word

Below are some tips to slect text quicky in MS Word, this is really very useful and very handy. This is a great feature of microsoft word and most of the users are unknown of this selecting style. Here are instructions to selct text:


Select a word:
Double click on any part of the word.

Select a line:
Click the left margin next to the line.

Select a sentence:
Hold down the CTRL key, then click anywhere in the sentence.

Select a paragraph:
Triple click any word within the paragraph.

Select the whole document:
Triple click in the left margin, or hold down the CTRL key, then click anywhere in the left margin. Yet another method you can use is to hold down the CTRL key, then press the letter A.

Make a vertical text selection:
Hold down the ALT key, then drag the mouse up.

Monday, July 26, 2010

Split text among Clumns in MS Excel - Useful Computer Trick

Suppose you have some data in word file or notepad about some person like first name, last name, age etc... Now you have to sort this data according to last name. This problem is very easy and can be solved easily by using MS Excel but what happens is when you copy paste whole content in Ms Excel file it will first and last name and age in the same cell.

Now how are you supposed to sort that list alphabetically by last name when first name is listed first?


The answer is that you can't you have to separate the first and last names somehow...
But how?

You could spend your time retyping the last name into the next column. It works but it's not a great plan since it could take long time if your list is really long.

So here is a fast way to separate the data, It will split text among columns in MS Excel. Make sure text should be deliminated( seperated by spcae or tab)Just follow these steps:

1). First copy paste content in MS Excel file.


2). Now Highlight the data that needs to be separated as shown in figure.


3). Now go to the Data menu, Text into Columns choice.


4). A 3-step wizard will start to guide you through the process.


5). On step 1 check at the top that the data will be delimited, Then click Next.


6). In step 2 you can select Deliminater (space or tab or any other) in the Delimiters section.
Deliminater tells Excel what character separates your pieces of data. If you select space as deliminater then when it find a space it place next piece of text in a new column.

It also shows preview of your data in the bottom window..

7). Click Next.


8). Click Finish.


Its done.

Just like magic your first and last names and ages are in separate columns,now you can sort them easily...


Sunday, April 18, 2010

Open Office 2007 files in office 2003


There is compatibility problem between office 2003 and 2007. As all programs in 2003 use all extensions like .doc, .xls while 2007 use diffrent extensions like .docx, .xlsx. So when we try to open .docx or .xlsx or any 2007 office file in office 2003. It shows compatibility issues and will not open file.
Here is solution for this problem. Microsoft provides free compatibility pack to convert office 2007 documents to the office 2003 format.
so just download this compatibility pack then by using this you can easily open 2007 office files.
below is link to download Microsoft compatibility pack.

Tuesday, March 30, 2010

Save MS Word to PDF Files - Cool Softwares


Pdf files is better than ms word in some aspects, So Here is software Cute Pdf Writer by using this you can convert ms word files into pdf files. Here is link for dowloding of Cute Pdf Writer.
First go and download it free by clicking on the link given below and then install it. After then you can use this software anytime to convert ms word document into pdf files


Steps to convert ms word into pdf

1). Firstly download cute pdf writer from the link given above and install it.

2). Open ms word document.

3). Select Print option.

4). Now select Cute pdf Writer.

5). Check the box all pages and click print.

6). Now select the place where you want to save it.

7). Click OK.

Its done.
Now your pdf file is ready.


Monday, March 15, 2010

Creating Keyboard shortcuts to open files, folder or browser

You can create a keyboard shortcut that can automatically open a folder, a program or a word file or any application or browser through your keyboard even when you have other windows like Internet explorer, Office maximized. This is very simple trick and very usful save lots of time. Here are steps:

1). Create a shortcut of the folder / program / file on the desktop.
2). Right click the shortcut on the desktop, and then click Properties.
3). In the Properties dialog box, click the Shortcut tab.
4). Now in the Shortcut key textbox, enter a key combination for example CTRL+ALT+R or CTRL+SHIFT+R or whatever you like.


Its done.

Now when you hit the key combination just specified, the folder / program / file will open even if other program windows are maximized.

Thursday, March 11, 2010

Make folder or file without a name - Cool Computer Tricks

Do you know how to make a folder without a name? is it possible? Yes it is possible you can make a folder or a file without any name. Just try this

1). Click the folder or file which you want to have no name.
2). Right click on it and then click rename and delete the old name.
3). Press ALT button from your keyboard and type 0160(holding alt) after that press enter. Note that while you will type 0160 it will not appear, but continue typing and press enter.. thats it.

Its Done.

Make sure that you are using the number pad, using just the row of numbers above the qwerty doesn’t work. For a laptop, if you dnt have number pad then check and see if there’s a pseudo-numpad that uses the fn key. then you can just hold down the fn and alt at the same time while typing in 0160.

For deleting this folder you have to rename it by using command prompt. rememver dont use space use alt+0160 as current file name.

Monday, March 8, 2010

Add effects to pictures in word 2007

Word 2007 has a ton of great effects that can be added to pictures in your documents, and they are all quickly accessible follow these steps:

1) open your documents having pictures.
2) Click on Format tab on the Ribbon.
3) Now here you find many options

For instance, if you want to add a border to your picture, just click the Picture Border drop-down button, where you can change the type of border you want, the colors, or the line thickness.


You can recolor picture, just click on recolor and then select color modes and variations.


You can also change pictures shape drop-down button and then select shape.
Bold


You can take this even a step further and add glowing effects or even 3D effects to your pictures by using the Picture Effects drop-down button.


Add Background Color To Word 2007 Documents


Follow given steps to add background color to word 2007 documents..
1) Open your word document.
2) Choose Page Layout on the Ribbon.

3) Select page color to select the background color you want.

The nice thing about Word 2007 is you just need to hover the mouse over each color to see a preview of how it will look in the document. Select the background color you want and you are done.

Wednesday, February 24, 2010

Protect MSOffice document with Password

You can protect your document by applying password so that unauthorized person can not display as well as modify your document.
Here are the steps:

1). Open any Office Documents.
2). Click File and Select Save As.
3). Now click Tools in that dialouge box.


4). Here click on General Option.
5). Now give the passwords to open and to modify.


6). click OK.
7). After that re-enter those passwords to confirm them.
8). Click Save button of Save As dialog box.Its done.

Now your document is password protected, noone can read or modify it without that password. You can use this trick to maintain and to protect your personal dairy from others..

Monday, January 11, 2010

Create Table without using mouse and menus in ms word


It’s possible create Table without using mouse and menus in MS word and Outlook. Here its that…


Type the content (+——+——-+——+) in Microsoft Word and press Enter. One row of a table will be created and for more rows you can press TAB.


Step 1:

+--+--+--+

Step 2: (After pressing Enter having the cursor at the last ‘+’ Result will be like the below one)


Step 3: (press TAB to create more Rows)

In this ' + ' represents the column borders and ' ' represents the length of the each column.