Showing posts with label SpeedUpXP. Show all posts

Saturday, August 21, 2010

Speed up your computer by cleaning RAM using notepad

If your computer become slow, when you are working with many programs. It may be due to RAM because at that time RAM is full of remaining progress pieces which you are working with and you do not need them any more. So, if you can erase or delete those unnecessary pieces of information, your computer RAM will be cleaned and your computer will be speed up.


Cleaning RAM is very easy task here are steps for it, just follow them:

1). Open notepad.

2). Type FreeMem=Space(64000000).

3). Save file with name "CleanRAM.vbs".

4). Close it and run the file.

It will free memory in RAM, if you want to free more memory than you can write following command in notepad instead of what given in step 2.

FreeMem= (256000000) for 256 mb
FreeMem= (128000000) for 128 mb
FreeMem= (72000000) for 72 mb
FreeMem= (64000000) for 64 mb
FreeMem= (32000000) for 32 mb
FreeMem= (24000000) for 24 mb

Make sure that you don't select the memory that is larger than your memory capacity.

Wednesday, August 11, 2010

Scan and Replace window's corrupted System Files

If your computer running slowly or not working properly then there may be some problem in its System files. System files are group of program files that work together to run your computer. These files can be changed or corrupted with time, it may corrupts due to installation of softwares, some internal errors or due to viruses, which makes computer slower.

Scan your system files to check if they are working fine or having some errors. In case of damaged system files you can repair or replace them. It can be done by System file checker.


System File Checker is a utility in Microsoft Windows that allows users to scan for and restore corruptions in Windows system files. This utility is available on Windows 98, Windows 2000, Windows XP, and Windows Vista.


Follow these steps to use System file Checker:

1). Go to Run.
2). Type SFC /SCANNOW and click on ok button.
3). It will start scanning proccess and this process takes longer time, it can be more than 30 mins.
4). In case window having some problems, It will display some steps to follow. just follow those steps.


Tuesday, August 3, 2010

Tips to Optimize your Computer's Performance

Wanna improve your computer performance?? If yes then optimize your computer's performance.Here are some easy and simple tips to optimize computer's preformance.

  1. Check registry files: Registry files control the software systems and programs on a computer. They can become damaged when you uninstall a program. Generally, uninstalling one program lead to a problem with another program that shared similar registry files. Therefore, use some good registry scanning software to determine if everything is working fine. There are lot of good registry scanners available in the market. Some of them are free wares.

  2. Remove unwanted icons from desktop: The easiest ways to optimize the computer’s performance is to cleanup the things on the desktop. The icons which you never use slow down a computer. Deleting these icons will free up some memory and speed up the computer. If you mistakenly install any application / software on the desktop, then be very carefull.

  3. Upgrade the computer's memory: Buying a memory may be costly, but it's very simple and easy way to speed up your computer. It will also fix memory errors if any. Before buying the memory or RAM for your computer, look for best shops, make a survey and find a best value deal.

  4. Use Program uninstallers: Many times, when programs are removed, they leave behind some traces. So, use a program uninstaller to uninstall or remove installed software. Choose any good uninstaller software like Advanced Uninstaller PRO or Total Uninstall etc.

  5. Delete every unwanted program from the task bar. They utilize memory and slowdown the computer. You can do this by following simple steps:
  • Click on Start and then Run.
  • Enter MsCONFIG. Press enter key.
  • Click on Start UP. Here you will find a list of start up programs.
  • Uncheck programs like real players, Office startup, Quicken Reminder, etc whih you want to remove.
  • Do NOT uncheck systray, Explorer and Virus check or scheduler programs.

These are some easiest tips which every user should follow to maintain his computer's performance.

Friday, July 30, 2010

Increase Download speed of your LAN - Get Maximum LAN speed

If you are tired of slow downloading speed of your LAN, then try this may be this works for you. Just follow given steps to get maximum LAN speed:

1). Open Control Manager.

2). Double click on Device Manager.

3). Now window will asked for your permission to continue, just click on continue.

4). In device manager window locate network card & double click on it.

5). It will open new window, Here click on Advanced tab.

6). Now locate speed and duplex in property and then on right hand side select 100mbps half duplex.

7). Click OK.

Its Done.

Now your LAN download speed must be faster than before, Its the maximum LAN download speed.

Thursday, July 29, 2010

Make Firefox faster - Lower the amount of memory it used

If you have old desktop PC of RAM less than 1 GB and have installed firefox. Then may be you noticed that your computer slow down after its installation. Here is trick to make it faster by decrease the amount of memory it used.


If your computer has ram of 1 gb or more than 1 gb, then you need not to do this.
Follow given steps:
1). Open firefox.

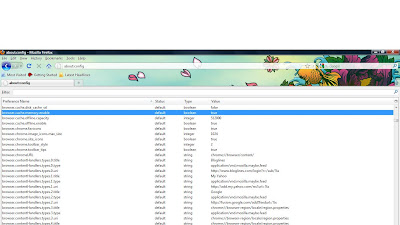
2). In your Firefox address bar, enter the following text: about:config.

3). Scroll down to the entry titled browser.cache.memory.enable and make sure the Value is set to true. If it’s not, double-click anywhere in the browser.cache.memory.enable line and the status will change to true.

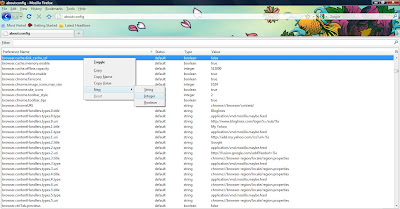
4). Now Right-click anywhere in the about:config window and select New and then Integer.


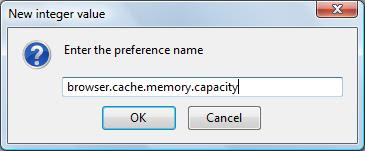
5). Enter preference name as browser.cache.memory.capacity in the New integer value window.


6). Click OK.

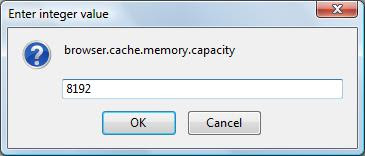
7). Now you have to enter a number in the Enter integer value, but that number depends on how much memory you have , how much you want to give Firefox. If you have 256MB or less RAM, enter 4096 as the value. If you have 512MB of RAM, enter 6144 or 8192.


8). Click OK.

Its done.

Restart firefox and seee then changes. It must be much faster now..


Sunday, April 11, 2010

SpeedUp Adobe Acrobat Reader


We all use adobe acrobat reader daily, but sometimes it gets very irritating when we want to open a pdf document and it takes 5 to 10 seconds to load. Now here is tricks to speed up acrobat reader. It will make acrobat reader to load very fast and will open instantly just like notepad.
Follow these steps:

1.
Go to the installation folder of acrobat reader like C:\program files\adobe\reader9.0\reader\plugins.

2. Now Cut all the files and folders present in plugins folder and paste them in optional folder in reader.

Make sure that acrobat reader is not open, If it is opend then first close it then move these folders otherwise it wont allow.
Its done.
Now Pdf files will load much faster.

Friday, March 26, 2010

Speed Up Firefox - Cool Tips and Tricks


Having trouble with your firefox speed?? Try this, It will surelyincrease firefox's speed..Just follow these steps:

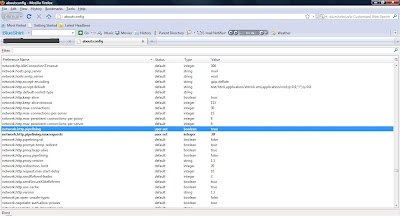
1). Go to address bar and Type about:config, and then hit enter.

2). Now here Search for network.http.pipelining double click on it, Set it True.

3). Search for network.http.proxy.pipelining, and make it also true.

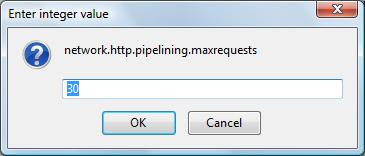
4). Search for network.http.pipelining.maxrequests, double click on it, I will open window like below, enter some higher value like 30 or 40.


5). Right-click anywhere and select New and then Integer.
6). Name it nglayout.initialpaint.delay, set its value to 0. This value indicates the amount of time the browser waits before it acts on information it recieves.

Its done.

Monday, January 18, 2010

Improve menushowdelay time of Start Menu

Sometimes Start Menu so much time to appear, but now you can speed up things, by changing the registry entry:
HKEY_CURRENT_USER/Control Panel/Desktop/MenuShowDelay
from the default 400 to something a little snappier. Like 0.

Monday, January 4, 2010

Increase Your Cable Modem or DSL Speed in XP

This tweak is for broad band cable connections on stand alone machines with WinXP professional version - might work on Home version also. It may also work with networked machines as well This tweak assumes that you have let WinXP create a connection on install for your cable modem/NIC combination and that your connection has tcp/ip - QoS - file and print sharing and client for Microsoft networks , only, installed. It also assumes that WinXP will detect your NIC and has in-box drivers for it. If it doesn't do not try this.

· In the "My Network Places" properties (right-click on the desktop icon and choose properties ), highlight the connection then at the menu bar choose "Advanced" then "Advanced Settings". Uncheck the two boxes in the lower half for the bindings for File and Printer sharing and Client for MS networks. Click OK.

· From the Windows XP CD in the support directory from the support cab, extract the file netcap.exe and place it in a directory on your hard drive or even in the root of your C:\ drive.

· Next, open up a command prompt window and change directories to where you put
netcap.exe. then type "netcap/?".
It will list some commands that are available for netcap and a netmon driver will be installed. At the bottom you will see your adapters. You should see two of them if using a 3Com card. One will be for LAN and the other will be for WAN something or other. · Next type "netcap/Remove". This will remove the netmon driver.

· Open up Control Panel->System->Dev Man and look at your network adapters. You should now see two of them and one will have a yellow ! on it. Right-click on the one without the yellow ! and choose uninstall. YES! You are uninstalling your network adapter, continue with the uninstall. Do not restart yet.

· Check your connection properties to make sure that no connection exists. If you get a wizard just cancel out of it.

Now re-start the machine.

· After re-start go to your connection properties again and you should have a new connection called "Local area connection 2". Highlight the connection, then at the menu
bar choose "Advanced" then "Advanced Settings". Uncheck the two boxes in the lower half
for the bindings for File and Printer sharing and Client for MS networks. Click OK.

· Choose connection properties and uncheck the "QOS" box.

· Re-start the machine.

After restart enjoy the increased responsiveness of IE, faster page loading, and a connection speed boost.

Why it works, it seems that windows XP, in its zeal to make sure every base is covered installs two separate versions of the NIC card. One you do not normally see in any properties. Remember the "netcap/?" command above showing two different adapters? The LAN one is the one you see. The invisible one loads everything down and its like your running two separate cards together, sharing a connection among two cards, this method breaks this "bond" and allows the NIC to run un-hindered.


Monday, December 28, 2009

Remove Hibernation File

If you do not use hibernation, make sure you do not have it enabled, which reserves disk space equal to your RAM. If you have a hidden file on root directory of your C-drive called hiberfil.sys, hibernation is enabled.

To remove that file:
. Go to Control Panel
. select Performance and Maintenance, Power Options, Hibernate tab, and uncheck the Enable hibernation box.

Clean Your Prefetch to Improve Performance

This is a unique technique for WinXP. We know that it is necessary to scrub registry and TEMP files for Win9X/ME/2000 periodically. Prefetch is new and very useful
technique in Windows XP. However, after using XP some time, prefetch directory can get full of junk and obsolete links in the Prefetch catalog, which can slow down your computer noticeably.

· Open C(system drive):/windows/prefetch,

. delete those junk and obsolete files,

. reboot.

It is recommended that you do this every month.

Turn Off Indexing to Speed Up XP

Windows XP keeps a record of all files on the hard disk so when you do a search on the hard drive it is faster.There is a downside to this and because the computer has to index all files, it will slow down normal file commands like open, close, etc. If you do not do a whole lot of searches on your hard drive then you may want to turn this feature off:

· Open My Computer.

· Right-click your hard drive icon and select Properties.

· At the bottom of the window you'll see "Allow indexing service to index this disk for faster searches," uncheck this and click ok.

· A new window will pop up and select Apply to all folders and subfolders. It will take a minute or 2 for the changes to take affect but then you should enjoy slightly faster performance.

Slow Network Access

Slow Network Access Not Always Due to Scheduled Tasks Check If you have very slow access to your network computers through "My Network Places" and have already deleted the Registry entry calling for a check of Scheduled Tasks on the other network computers (documented elsewhere on this site) AND you have multiple network adaptors (i.e. a cable or DSL connection through one NIC and an internal network using a second NIC) check the following:

· Right-click on "My Network Places", go to Properties.

· Right-click on the NIC that your cable/DSL connects to, and choose Properties.

· Select Internet Protocol(TCP/IP), click on Properties.

· Click on "Advanced", go to "WINS" tab, chose Disable NetBios over TCP/IP.

· When you are back at your Network Connections page, right-click on the Broadband selection.

· Choose "Properties", click on the Networking tab.

· Again, choose TCP/IP, Properties, Advanced, WINS, and select "disable NetBios over TCP/IP".


Disable XP Boot Logo

It is possible to disable the XP splash screen, which will slightly speed up the overall boot process. Be aware that removing the splash screen will also cause you not to see any boot-up messages that might come up(chkdsk, convert ... ), but if your system runs without any problems then it should not matter.

· Edit boot.ini.
· Add " /noguiboot" right after "/fastdetect".

Upon restarting, the splash screen will be gone. It can be re-enabled by removing the new switch.

Correcting System Hang at Startup

If your system hangs about 2 or 3 minutes at startup, where you cn't access the Start button or the Taskbar, it may be due to one specific service (Background
Intelligent Transfer) running in the background.

Here's what you do:
· Click on Start/Run, type 'msconfig', then click 'OK'.
· Go to the 'Services' tab
. find the 'Background Intelligent Transfer' service.
· Disable it, apply the changes & reboot.


Speed Up Detailed View in Explorer

If you like to view your files in Windows Explorer using the "Details" view here is a tweak to speed up the listing of file attributes: Viewing files in Windows Explorer using the "Details" mode shows various attributes associated with each file shown. Some of these must be retrieved from the individual files when you click on the directory for viewing. For a directory with numerous and relatively large files (such as a folder in which one stores media, eg: *.mp3's, *.avi's etc.), Windows Explorer lags as it reads through each one. Here's how to disable viewing of unwanted attributes and speed up file browsing:

· Open Windows Explorer.

· Navigate to the folder which you wish to optimize.
· In "Details" mode right-click the bar at the top which displays the names of the attribute columns.

· Uncheck any that are unwanted/unneeded.

Explorer will apply your preferences immediately, and longs lists of unnecessary attributes will not be displayed.

Likewise, one may choose to display any information which is regarded as needed, getting more out of Explorer.


Tuesday, December 22, 2009

Shutdown XP Faster

Like previous versions of windows, it takes long time to restart or
shutdown windows XP when the "Exit Windows" sound is enabled.
To solve this problem you must disable this useless sound.

· Click Start button.
· Go to settings > Control Panel > Sound, Speech and Audio
devices> Sounds and AudioDevices > Sounds.
· Then under program events and windows menu click on
"Exit Windows" sub-menu and highlight it. Now from sounds
you can select, choose "none" and then click Apply and OK.

Now you should see some improvements when shutting down
your system.